A Step-by-Step Guide to Enhancing Images with Advanced AI Models
Restoring image quality with AI is now important in fields like photography and digital art. Recent AI advancements, including Real-ESRGAN, SwinIR, and BSRGAN, have significantly improved image restoration, achieving results that seemed unimaginable 5 years ago.
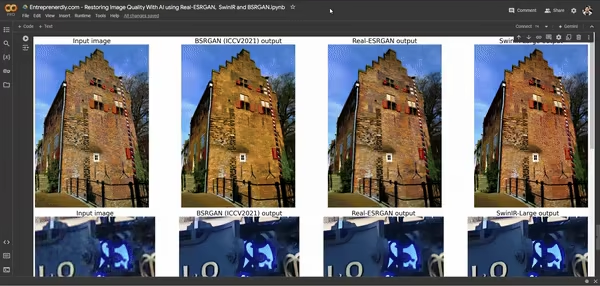
We will explore how three AI models—Real-ESRGAN, SwinIR, and BSRGAN—restore image quality effectively. We will compare their performance and highlight their strengths. A Google Colab Notebook will be provided to allow you to apply these technologies to your own images with a few clicks.
Each model offers unique strengths that cater to different restoration needs, whether improving backgrounds, enhancing fine details, or recovering lost features in faces. Having this knowledge will be beneficial if you ever need to improve the quality of your photos.

1. Understanding Image Quality Restoration
AI-based image restoration improves degraded images affected by noise, blur, or compression artifacts. In this article, we will cover 3 of the strongest AI models.
These models train on large datasets, learning how to convert low-quality images into high-quality ones. As a result, they effectively address a wide range of issues.
Real-ESRGAN
Real-ESRGAN builds on the ESRGAN model and optimizes it for real-world image restoration. This model improves resolution and includes a mode specifically for facial enhancement.
It is especially useful for restoring degraded photos that need quality improvements in both faces and backgrounds.
Additionally, Real-ESRGAN offers specialized models for anime video upscaling and restoration. This models as been fine-tuned on anime videos during its training process. See example below.
Figure 1. Low-quality anime video on the left and the right video shows the result after Real-ESRGAN inference. Source: https://github.com/xinntao/Real-ESRGAN
For more details on the Real-ESRGAN, visit the following resources:
SwinIR
SwinIR, built on the Swin Transformer architecture, brings a new level of sophistication for restoring image quality.
Unlike traditional convolutional models, SwinIR uses a hierarchical structure with shifted windows to capture both local and global image features.
This unique approach makes it exceptionally effective in tasks such as super-resolution, denoising, and JPEG artifact removal.
SwinIR excels by modeling long-range dependencies within images. This allows it to process complex degradations effectively. Its architecture is particularly well-suited for high-quality image reconstruction tasks.
This model is especially effective in improving backgrounds, handling complex degradations, and maintaining overall image coherence.

Figure. 2: SwinIR architecture with a hierarchical structure and shifted windows. This design captures local and global image features for superior image restoration. Source: https://github.com/JingyunLiang/SwinIR
For more details on the Real-ESRGAN, visit the following resources:
BSRGAN
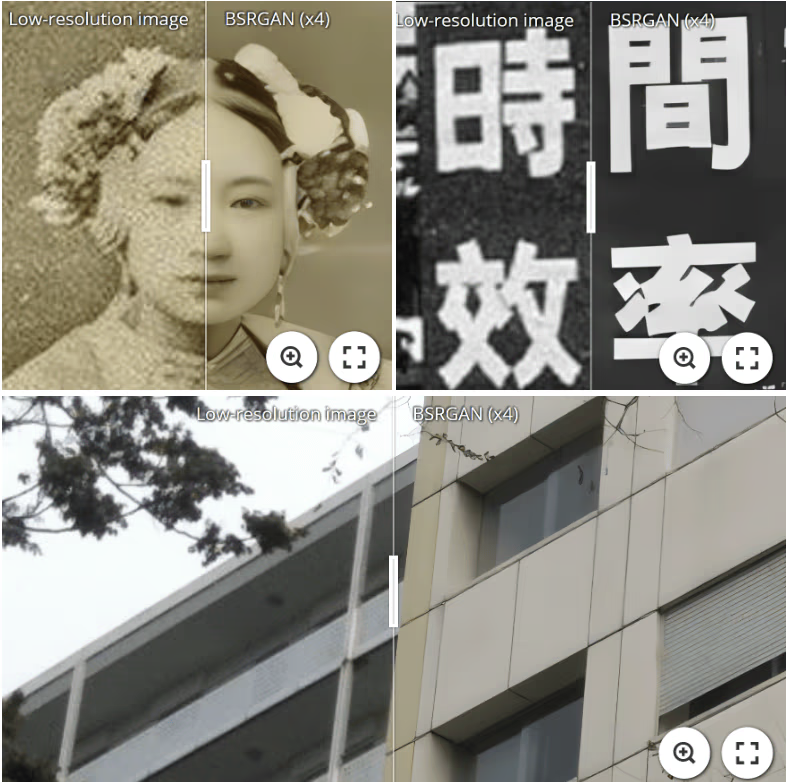
BSRGAN focuses on blind super-resolution, restoring images without needing explicit details of the degradation process. It uses a GANs to enhance image details while maintaining a natural appearance. This makes it ideal for tasks where fine details are crucial.
BSRGAN excels in handling unknown degradations. It adapts to various real-world scenarios without prior information. This offers flexibility in situations where image quality varies significantly. Although BSRGAN is a bit older and less sophisticated than Real-ESRGAN and SwinIR, it remains a strong option worth trying for many image restoration tasks.

Figure. 3: Comparison between low-resolution images and BSRGAN-enhanced images (x4). Source: https://github.com/cszn/BSRGAN
For more details on BSRGAN, visit the following resources:
Training Code
If you want to train your own model, you can use the KAIR Repository. There you’ll find all the necessary training and testing codes for a range of image restoration models, including USRNet, DnCNN, FFDNet, SRMD, DPSR, MSRResNet, ESRGAN, BSRGAN, SwinIR, VRT, and RVRT.
The repository essentially allows you to configure training settings like GPU usage and data paths through JSON files, and it supports both DataParallel and DistributedDataParallel training methods.
However, in this article, we will focus on inference and application rather than training.
3. Python Implementation
Let’s now implement the models for inference. In this section, you’ll need a few images for which you’d like to improve the quality. Alternatively, you can use the sample images included when cloning the repositories below.
3.1 Setting Up the Environment
To implement the models for restoring image quality, you’ll need to ensure your environment meets the following requirements. Alternatively, just run the Google Notebook below in a T4 compute environment and it should work.
- Hardware: A machine with an NVIDIA GPU (at least 4GB VRAM) to accelerate processing. CUDA support is needed for efficient training and inference.
- Software: Python 3.8 or later, with necessary libraries including PyTorch (version 1.7 or later), torchvision, and other dependencies.
Start by cloning the repositories and downloading the models:
					# Clone realESRGAN
!git clone https://github.com/xinntao/Real-ESRGAN.git
%cd Real-ESRGAN
# Set up the environment
!pip install basicsr
!pip install facexlib
!pip install gfpgan
!pip install -r requirements.txt
!python setup.py develop

# Clone BSRGAN
!git clone https://github.com/cszn/BSRGAN.git

!rm -r SwinIR
# Clone SwinIR
!git clone https://github.com/JingyunLiang/SwinIR.git
!pip install timm

# Download the pre-trained models
!wget https://github.com/cszn/KAIR/releases/download/v1.0/BSRGAN.pth -P BSRGAN/model_zoo
!wget https://github.com/xinntao/Real-ESRGAN/releases/download/v0.1.0/RealESRGAN_x4plus.pth -P experiments/pretrained_models
!wget https://github.com/JingyunLiang/SwinIR/releases/download/v0.0/003_realSR_BSRGAN_DFOWMFC_s64w8_SwinIR-L_x4_GAN.pth -P experiments/pretrained_models
3.2 Upload Images
Next, to upload the images for restoration. All the images uploaded to “Upload Folder” will be processed by all the models later on.
Alternatively, you can use the sample images included in many of the cloned repositories. For example, in the ‘REAL-ESRGAN/inputs’, you can find some images that you can use.
In this code, we’ll use the sample images included in 'Real-ESRGAN/BSRGAN/testsets/BSRGAN'
					import os
import glob
from google.colab import files
import shutil
print(' Note1: You can find an image on the web or download images from the RealSRSet (proposed in BSRGAN, ICCV2021) at https://github.com/JingyunLiang/SwinIR/releases/download/v0.0/RealSRSet+5images.zip.\n Note2: You may need Chrome to enable file uploading!\n Note3: If out-of-memory, set test_patch_wise = True. This will process the image in smaller patches and then stitch them back together.\n')

# If your system runs out of memory, set test_patch_wise = True to process images in smaller patches.
# This helps avoid out-of-memory errors by handling each patch independently.
test_patch_wise = False

# Clean up existing directories to avoid conflicts with BSRGAN
!rm -r BSRGAN/testsets/RealSRSet
upload_folder = 'BSRGAN/testsets/RealSRSet'
result_folder = 'results'

# Check if the upload and result directories exist, and remove them if they do.
if os.path.isdir(upload_folder):
    shutil.rmtree(upload_folder)  # Clear the upload directory to start fresh.
if os.path.isdir(result_folder):
    shutil.rmtree(result_folder)  # Clear the result directory to avoid conflicts.

# Create new directories for the uploaded images and results.
os.mkdir(upload_folder)
os.mkdir(result_folder)

# Upload images for testing. You can select multiple images for batch processing.
uploaded = files.upload()

# Move each uploaded image to the designated folder for processing.
for filename in uploaded.keys():
  dst_path = os.path.join(upload_folder, filename)
  print(f'Moving {filename} to {dst_path}')
  shutil.move(filename, dst_path)
Sometimes, you may run out of GPU memory in Google Colabs. Use the code below to empty the cache. This is especially needed when you are re-running the inference process on more images.
					# empty cache with torch
import torch
torch.cuda.empty_cache()
3.3 Adjust Problematic Code in the Source
When running the source code as it is, you’ll encounter the following issue when trying to make inferences:

Newsletter
