Experience the Future of Intelligent Investing Today
Back To Top
Experience the Future of Intelligent Investing Today
Customizing realistic human photos is a challenging task in the world of AI. Traditional methods like GANs and diffusion models often need extensive fine-tuning. This process is time-consuming and resource-intensive. However, PhotoMaker offers a novel and impressive solution with its Stacked ID Embedding technique.
PhotoMaker allows the generation of high-fidelity custom images from just a few reference images. These images maintain the unique identity characteristics of individuals across different contexts and prompts. By combining identity features from multiple ID images into a single, unified representation, PhotoMaker achieves consistent and accurate results without extensive adjustments.
This article explores the methodology behind PhotoMaker, detailing the Stacked ID Embedding technique and its integration into text-to-image models. Moreover, we will show its superiority in maintaining identity fidelity and text controllability.
Furthermore, we provide an end-to-end Python implementation of PhotoMaker in Google Colab. This guide will walk you through the setup and usage of this powerful tool. Finally, we discuss the practical applications of PhotoMaker and its potential limitations.
The core innovation of PhotoMaker lies in its Stacked ID Embedding technique. This technique enables the model to generate high-fidelity images without the need for extensive fine-tuning.
By combining identity characteristics from multiple ID images into a single, unified representation, PhotoMaker ensures that the generated images maintain the identity features across different contexts and prompts. This approach significantly enhances the process of customizing realistic human photos.
Stacked ID Embedding works by:
Given a set of 𝑁 input ID images {𝐼1,𝐼2,…,𝐼𝑁}, the first step is to extract their embeddings using the CLIP image encoder. Each image 𝐼𝑖 is first preprocessed to focus on the ID region, often masking non-ID areas using random noise:
Next, the preprocessed images pass through the CLIP image encoder to obtain their embeddings:
where 𝑒𝑖 is the embedding of the 𝑖-th preprocessed image.
Simultaneously, the text prompt 𝑇 is encoded using the CLIP text encoder to generate text embeddings:
To incorporate the semantic information of the class word (e.g., “man” or “woman”), each image embedding 𝑒𝑖 is fused with the class word feature vector 𝑐 using MLP layers:
where 𝑒𝑖′ is the fused embedding. This process ensures that the image embedding is contextualized with the relevant class word information.
Subsequently, the fused embeddings from all input ID images are concatenated to form the stacked ID embedding 𝑠∗:
This embedding 𝑠∗ encapsulates the identity information from all input images into a unified representation, needed for customizing realistic human photos.

Figure. 1: Overview of the Stacked ID Embedding Pipeline. The process starts with image downloading and face detection, followed by ID verification, cropping and segmentation, and finally, captioning and marking. This pipeline ensures that the training data is of high quality and relevant to the task of identity embedding and image generation.
The stacked ID embedding 𝑠∗ replaces the class word feature vector in the original text embedding to form the updated text embedding 𝑡∗:
where 𝑡𝑖 are the components of the original text embedding, and 𝐿 is the length of the text embedding.
The diffusion model employs a cross-attention mechanism to integrate the stacked ID embedding into the text-to-image generation process. The attention mechanism computes the attention weights and applies them to the value vectors:
1. Query, Key, and Value Projections:
where 𝑄, and 𝑉 are the query, key, and value projections, respectively, and 𝜙 is an embedding function. 𝑊𝑄, 𝑊𝐾, and 𝑊𝑉 are learned projection matrices.
2. Attention Weights Calculation:
where 𝐴 is the attention matrix, and 𝑑 is the dimension of the key vectors.
3. Applying Attention:
The attention mechanism allows the model to focus on relevant parts of the text and ID embeddings during the generation process.
The diffusion model uses the updated text embedding 𝑡∗t∗ and the attention mechanism to generate images that reflect the input ID characteristics and follow the text prompt. The generative process involves:
Mathematically, the generative process can be represented as:
where 𝐺 denotes the generative function of the diffusion model.
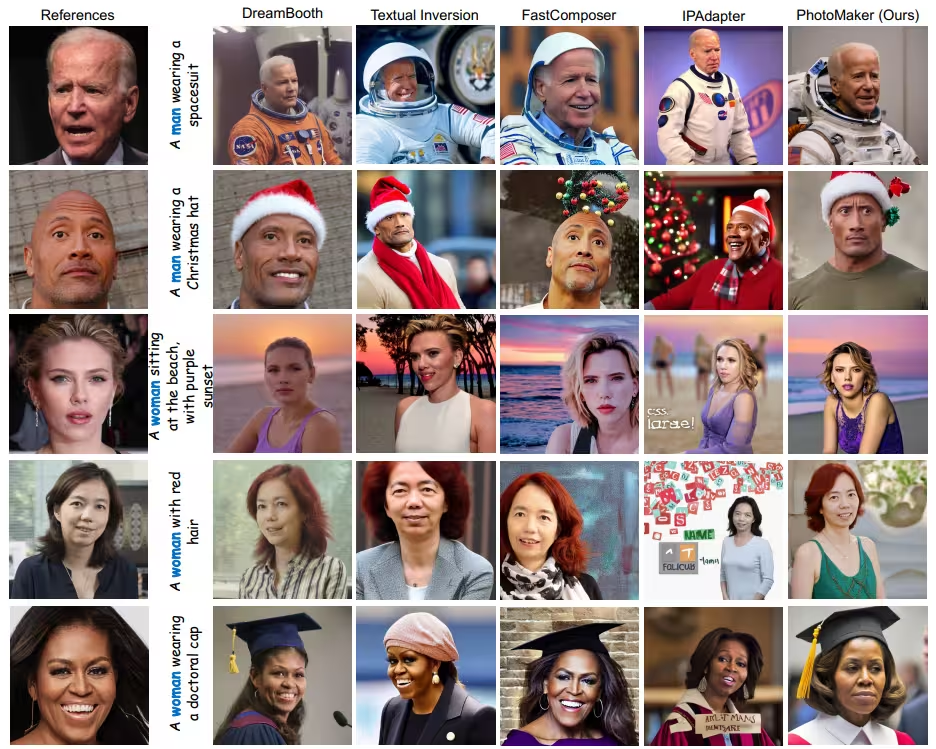
The authors of the technology compare the effectiveness of PhotoMaker against other methods such as DreamBooth, Textual Inversion, FastComposer, and IPAdapter. The comparison shows that PhotoMaker maintains superior identity fidelity and text controllability across various scenarios.

Figure. 2: Comparison to Other Methods - Identity Fidelity and Text Controllability. The comparison with other methods (DreamBooth, Textual Inversion, FastComposer, and IPAdapter) in Figure 1 illustrates the superiority of PhotoMaker. The images generated by PhotoMaker show superior identity fidelity and text controllability compared to other methods.
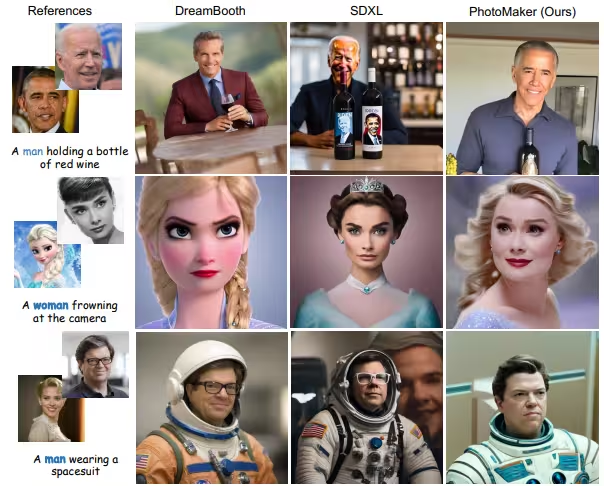
Moreover, PhotoMaker has the ability to combine characteristics from different identities through identity mixing. This process is controlled by adjusting the proportion of different ID images or by using prompt weighting:
where 𝛼𝑖 are the weights for each ID image embedding. This allows the generation of new, composite identities blending features from multiple sources, thus enhancing the customization of realistic human photos.

Figure. 3: Identity Mixing - Combining Characteristics from Different Identities. This process involves combining characteristics from different identities by adjusting the proportion of different ID images or using prompt weighting.
The effect of varying the number of input ID images on the generated results is significant. Using more ID images improves ID fidelity but may trade off some text controllability. Thus, the optimal number of images balances both aspects, ensuring high-quality, realistic outputs.

Figure. 4: Varying Quantity of ID Images - Impact on Fidelity and Controllability. Using more ID images improves ID fidelity but may trade off some text controllability. The optimal number of images balances both aspects, ensuring high-quality, realistic outputs.
To get started, we need to install the necessary libraries. These libraries support the core functionalities of PhotoMaker, such as diffusion models, model acceleration, and efficient fine-tuning.
Installing diffusers and accelerate optimizes both the model training and inference processes. The peft library (Parameter-Efficient Fine-Tuning) is critical for fine-tuning large models efficiently, reducing the overall computational load.
					# Hide outputs
%%capture
# Install the necessary libraries
!pip install diffusers  # Library for diffusion models, used for image generation
!pip install accelerate  # Library to accelerate model training and inference
!pip install git+https://github.com/TencentARC/PhotoMaker.git  # Install the PhotoMaker package directly from GitHub
!git clone https://github.com/TencentARC/PhotoMaker.git  # Clone the PhotoMaker repository
!pip install peft  # Install PEFT library for efficient fine-tuning of large models

# Set current directory to the recently cloned repo
%cd PhotoMaker/
Next, we import the necessary libraries. Schedulers like EulerDiscreteScheduler and DDIMScheduler help control the diffusion process during image generation, impacting the quality and style of the generated images.
					# Import necessary libraries
import torch  # PyTorch, used for tensor operations and model training/inference
import numpy as np  # NumPy, used for numerical operations
import random  # Random module, used for generating random numbers
import os  # OS module, used for interacting with the operating system
from PIL import Image  # PIL, used for image processing
import peft  # PEFT, a huggingFace library used for parameter-efficient fine-tuning
from diffusers.utils import load_image  # Utility function to load images from diffusers
from diffusers import EulerDiscreteScheduler, DDIMScheduler  # Schedulers for diffusion models
from huggingface_hub import hf_hub_download  # Hugging Face Hub, used for downloading models and other assets
from photomaker import PhotoMakerStableDiffusionXLPipeline # Import the PhotoMaker pipeline from the PhotoMaker package
To visualize the generated images, we create a function that arranges them in a grid. This helps in comparing multiple images side-by-side. By dynamically adjusting the grid’s rows and columns based on the number of images, this function ensures optimal space usage and visual clarity.
					# Function to create a grid of images
def image_grid(imgs, size_after_resize):
    """
    Create a grid of images.

    Args:
        imgs (list): List of images to be arranged in a grid.
        size_after_resize (int): Size to which each image should be resized (both width and height).

    Returns:
        Image: A single image composed of the input images arranged in a grid.
    """
    num_images = len(imgs)
    cols = int(math.sqrt(num_images))  # Determine number of columns
    rows = math.ceil(num_images / cols)  # Determine number of rows

    w, h = size_after_resize, size_after_resize  # Define width and height for resizing images

    grid = Image.new('RGB', size=(cols * w, rows * h))  # Create a new blank image for the grid

    # Paste each image into the grid
    for i, img in enumerate(imgs):
        img = img.resize((w, h))  # Resize image
        grid.paste(img, box=(i % cols * w, i // cols * h))  # Paste image into the grid

    return grid  # Return the final grid image

Newsletter